


My Tips When Free Beading; Part 1
- Maddy

- Aug 24, 2023
- 5 min read
What Is Free Beading?
If you don't know what I mean by free beading. it is what it says. Beading without using a pattern to follow. You are beading whatever you'd like, in whatever pattern you decide. But... It's a lot trickier than you would think. I originally made a video on my Pinterest trying to explain my first tip to free beading. As I got ready to write out my captions, I came to holt. And realized it was going to be a lot harder than I anticipated, to try and explain in words what I wanted to, but without writing out a novel for everyone to attempt to read in just over the minute that the video is.
Because of this dilemma I had run into, I thought it would be best to write out a detailed blog post on each of the tutorials I upload on this subject.
So here we go...
If you haven't already, I would suggest watching the video I put on social media. You can find it on Pinterest, Instagram, TikTok or YouTube
Tip #1: Beading Vertically
My first tip for you when free beading is an important one, and one I want to make sure I explain clearly. I believe it is a great place to start when laying down your foundation for learning how to free bead. And that tip is simple.
You have to start looking at your bead loom piece you're making by each row you are going to bead. Not by the whole picture. Why? Because when beading multiple designs, shapes and colors you need to pay attention to when those certain shapes are going to start, being aware of what other designs you have going on and how to transition from design to design. You may be beading along and realize "I wanted to do a zigzag right there, but I should have started it 3 rows back." Then you have to decide if you want to unbead all those rows or just skip it. Or maybe you start to bead out a shape only to realize that you are going to run into the right side border you had started, now you have to decide whether to merge them, unread a few rows or come up with a different idea. You really need to be thinking ahead of time what you want your design to look like. And I'm not saying to you have to think of what you want your entire bead loom piece to look like, just thinking ahead in sections. Remember, you don't have a pattern. If you did or decided to created a pattern, then you wouldn't be free beading right??
Now that probably sounds confusing still, which is fine! Lets look at an example of one of my more recent designs that has a lot going on at the same time.

Let's zoom in and focus on the 3 rows inside the yellow
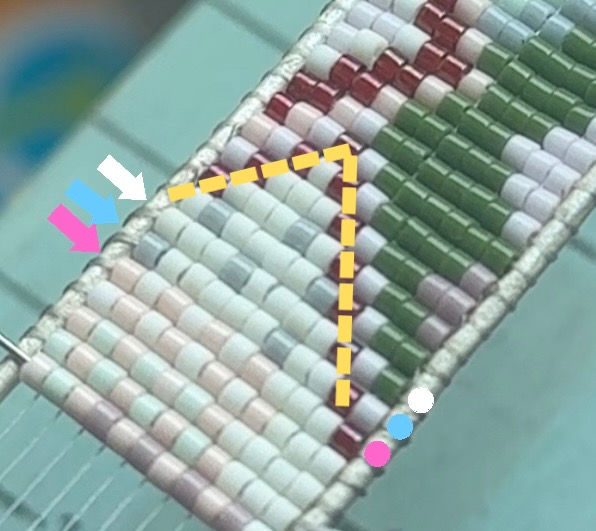
If we look at this section as a whole, we can see that there is some checkered pattern going on with the pink, cream, and eventually purple. Then the end of some bordering of the green with the translucent red/grey and lastly some grey "polka dots" or dots scattered in the cream background also.
Side Note* I sometimes like to have a base background color with my pieces. So that when you look at it, it looks as if someone was doodling random things on the bracelet, but with beads. This bracelet's background color is matte cream. So anytime I'm not beading a shape, line, free styling a section or something, the color will always be cream for this bracelet. You don't have to do it this way. I have a lot of bracelets that don't have a background color.
First, let's look at this in the direction I would have been beading it. Which is down. So the white row was first, then the Blue, and lastly the pink.
White row:
I had my scattered gray 'polka dots', part of my green background triangle type thing, and the translucent red/light purple;grey bordering of my triangle looking shape.
Blue Row:
second to last row of my green triangle bordering, and the last row of my grey polka dots.
Pink Row:
The start of my pink checkered part, and the last of my bordering for my green triangle type shape, no more of my polka dots.
We have 3 main shapes/patterns going on here. The polka dots, the triangle pattern and the beginning of the pink checkered pattern.
When you are threading your beads onto your needle you need to be conscious of what beads to use. It helps me when I count out the number of beads I use for each row. This bracelet was 11 beads thick. So as I'm beading I'm counting to 11 as well as paying attention to what color of beads to use. Especially with polka dots, you don't want your polka dots all clumped together right? So you also want to be aware of the placement of the previous dots in the rows before. I ended up making an arrow shape or weird squiggly line before because I wasn't paying attention to where I placed dots in my previous rows.
It also helps if you remember with triangle shapes (which you tend to make a lot of, at least I do) you will be beading in odd numbers. Just like how the cream background with grey dots appears, as I am closing my green filled triangle type shape, that cream background is appearing in a triangle shape as well (outlined in yellow dotted lines). So I know that each row I am going to be adding 2 more cream beads whether it's 3,5 or 7, etc.; to continue my triangle. It helps with choosing starting placements for other components you want to begin in the row you're working on. Ex. starting a line at bead 3 when you are beading 5 beads of triangle (then it starts in the middle).
Ending Thoughts
I don't want to make this blog too long and start overwhelming anyone, it's a lot to process and think about. So I am going to leave it at that for my first tip; Beading Vertically. Hopefully it has given you some good insight.
You have also probably gathered that there is a lot that goes on when free beading. And while that is definitely true, you can't overthink it. Once you start to over think it, it gets overwhelming and you will have a hard time beading freely or enjoying it. I hope giving you a glimpse into how my thought process is when free beading, can give you some guidance for when you want to try it out yourself. I will do more blog posts on free beading, to hopefully help those of you that are wanting to try it out. It really is so rewarding to create something you know, no one else has done before.


Comments