


How To Taper The Ends Of Your Bead Loom Work
- Maddy

- May 4, 2023
- 4 min read
Updated: Aug 1, 2023
Skill Level: Intermediate (Beginners still welcome!)
For My Full 1-Minute Tutorial Click Here

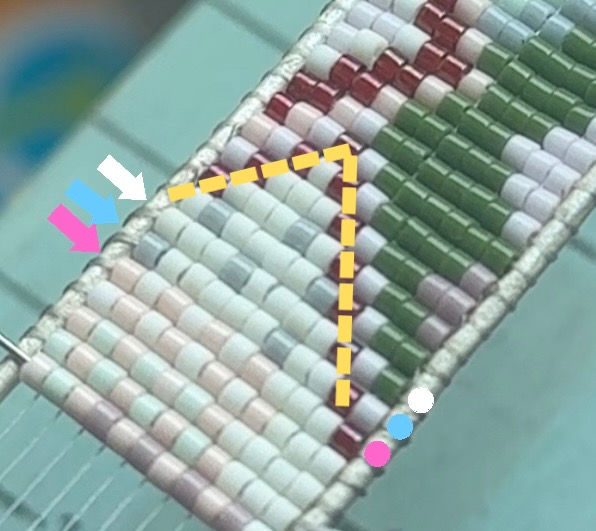
If you aren't quite sure what I am talking about when I say "Taper" your beadwork, take a look at the picture above. Do you see how the end of my work gets fewer in beads until there's only 1 left? That's tapering!
I will say, this is more of an intermediate skill, however that doesn't mean if you're new to craft of bead looming, you can't accomplish it. Of course you can! It is a bit tricky though, even I have a difficult time getting my beads to stay perfectly lined up and not crooked.
Before we go over the steps I want to mention a few things. First, if you plan to taper both sides, bead your project normally, taper the end side, then go back to the beginning and taper that side. I haven't tried it, but it would be very difficult to try and taper the beginning, starting at 1 bead and adding beads from the beginning.
Lastly, when cutting off your project when you've finished tapering both sides, I would suggest cutting your threads as long as possible. It helps when you're deciding how to finish your bracelet. Wether that's braiding the ends and tying off your bracelet, using a clasp to finish it or whatever way you want to finish it off.
Now how does one accomplish this tapered look?
It's quite simple once you have tried it out, and in my opinion, even beginner beaders can do it! All you need to do is follow the few steps and tips below.
Steps & Tips:
Step & Tip 1:
Tapering is easier to accomplish if your beaded piece is an odd number of beads across (an odd number of beads you use for each row). You can use an even number, you will just end up with 2 beads at the end of your tapering. When you're ready to do your tapering, you are going to skip stringing on the outer beads on each side, subtracting your bead count by 2.
Ex. Your bead project is 9 beads in width. You are going to only use 7 beads and skip the outer spaces where those 2 other beads would have gone, when weaving your beads. (See picture below)

Move your bead loom threads (the threads that string across your loom) inward towards the center, as you do each row. This helps keep your threads close to your outer beads as you bead fewer and fewer.
Continue subtracting 1 bead on each end for every new row until you get down to 1 (or 2) beads. Once you get to your last row, it gets a little tricky.
Step & Tip 2:
Securing your work after tapering requires more weaving, knotting & creativity. As you started to bead less and less beads in your rows, you most likely will realize it's a bit tricky and quite hard to pull those threads you skipped, tightly up against your outer beads. The last row is no different. In fact, it's the hardest to finish.
To help explain my tip, we are going to use the picture below as a reference guide. I have numbered some of the rows of beads 1-6, so my instructions don't get confusing.

If your last few rows start to go crooked, don't panic! My best tip for you is this; let's say you just finished row 1, I would weave back through rows 2 &3, you can even weave back as far as row 5. Then I would weave back through them again so you end up back at row 1. This will help pull your rows that are crooked, together.
I will even weave back through the row I did previously, then back through the row of beads I just beaded. So if I'm at row 1, I'd weave back through row 2, then 1 again. I usually repeat this 2-4x. This will help pull rows together, closing gaps and straightening them out.
You can even do the same thing with rows further back. You could weave to row 4, then back to 3, then 4, then 3. Pulling rows 3 & 4 tighter together.
You can also do this as you are in the middle of your bead tapering. Say you are only on row 3, and it's really crooked. Go ahead and weave back to row 6 or 7, then back up to 3.
My whole point of giving these scenarios is, if your beads go crooked, or there's gaps between your rows, there's nothing telling you that you can't be creative. Experiment with your beading. Weave back and forth between rows. If that doesn't work, weave in circles between rows. There's no rules to beading. There is technique you must do in order to make beading work, but there's no rules.
Step & Tip 3:
After you have finished beading and fixing all your tapered rows, the last thing to do is tying all bead loom threads together to finish off that side of your project.
How I do this is simple. If you followed my tip of moving your bead loom threads inward toward the center as you were tapering, it makes this a lot easier. Wrap your needled thread around all your loom strings, tie a knot and pull tight. Repeat this as many times as you feel necessary.

I also like to weave back through my last 2 rows to help pull the knots as close to my beads as possibly. This will also help straighten out your rows of beads.
Once you feel the end you've tapered is secure. Weave your thread back through 2-3 rows and cut.
Leave the tapered side you just did alone, if you need to taper the other side. Once you've done both sides (if that's what you are choosing to do), cut your projects off. Like I mentioned before we went over these steps, I suggest cutting the ends as long as possible so you have plenty of threads to finish your project however you'd like.
Until next time lovelies!
Maddy
Follow Me Social Media!
If there is a certain technique, topic or question you have; please feel free to email, message me on social media or comment in the comment section!


Comments